Monday, March 31, 2014

The First Competitions

Team 4992, the Spartans competed at the First Waterloo Competition March 20 - 22 and at the North Bay Competition March 27 - 29. Both competitions provided the students with many opportunities to grow, learn and mature. In their first 2 outings they got to see what happens at a competition both behind the scenes and on the field. The team was able to come together and work to solve problems and strategize through a combination of observation and discussion.

On Wednesday March 19th one other student and I took the robot along with a toolbox and several boxes of spare parts to the Physical Education building at the University of Waterloo where each team is given a 10 foot by 10 foot "pit" area with a table and power. The next day we set about making the area useful for robot repair and maintenance and discovered we needed a way to stow all of our coats and bags. That night I bought some plastic shelving and a collapsable picnic canopy to help organize and define our space.

Our first inspection revealed a misunderstanding in the pneumatic circuit setup that required a rebuild of the entire high pressure side of the system. With the loan of a couple of parts from 1334, our friends in Oakville, we had the bot up and running in time to do some practice rounds on Thursday.


Friday saw the robot performing as required while the students quickly developed a deeper understanding of the Aerial Assist game play. Due to the scoring structure of this years game alliances of 3 teams were able to score very high by passing the ball from human to robot to robot then over the truss to human to robot to high goal. Our team quickly found their place as the lead robot, taking the ball from the first human player and passing it quickly to the next bot. Most of the other alliances at Waterloo concentrated on the same cycle and by Saturday morning we saw scores approaching 300 points. The repetitive cycling made for a dramatic and enjoyable show for the audience and relied on driver skill and robot performance.

4992 finished the round robin with a rank of 20 out of 30 and was picked by the teams from Rick Hansen Secondary in Mississauga and St Davids in Waterloo to form an alliance Saturday afternoon. They continued to play the rapid high score cycling game which saw them through right to the final match where they were defeated. You can imagine the excitement of the team, the parents and the teachers as the alliance progressed through the afternoon. I think we hurt our faces smiling so much and many of us were hoarse and deaf from the shouting.


The competition in Waterloo relied on parent volunteers driving several student to and from Waterloo each day. The competition in North Bay was organized centrally by the school board since all 7 Halton teams appeared and we would need buses and hotel rooms. Generous donations from our sponsors made it possible.

The teams at the North Bay event were much more aggressive about defence and seemed to enjoy brute force pushing and shoving over the finesse and skill seen at Waterloo and so we saw very few high scoring rounds. Many more bots seemed to be plagued with electrical and mechanical malfunctions as well. Our robot made it through to the elimination rounds on Saturday afternoon, forming an alliance with our cross town mentors from Milton District High School and Burlington Central High School making our alliance the "Halton" alliance. Unfortunately the pushing and shoving continued along with the break downs and our alliance lost 0 - 2  while the afternoon was young.
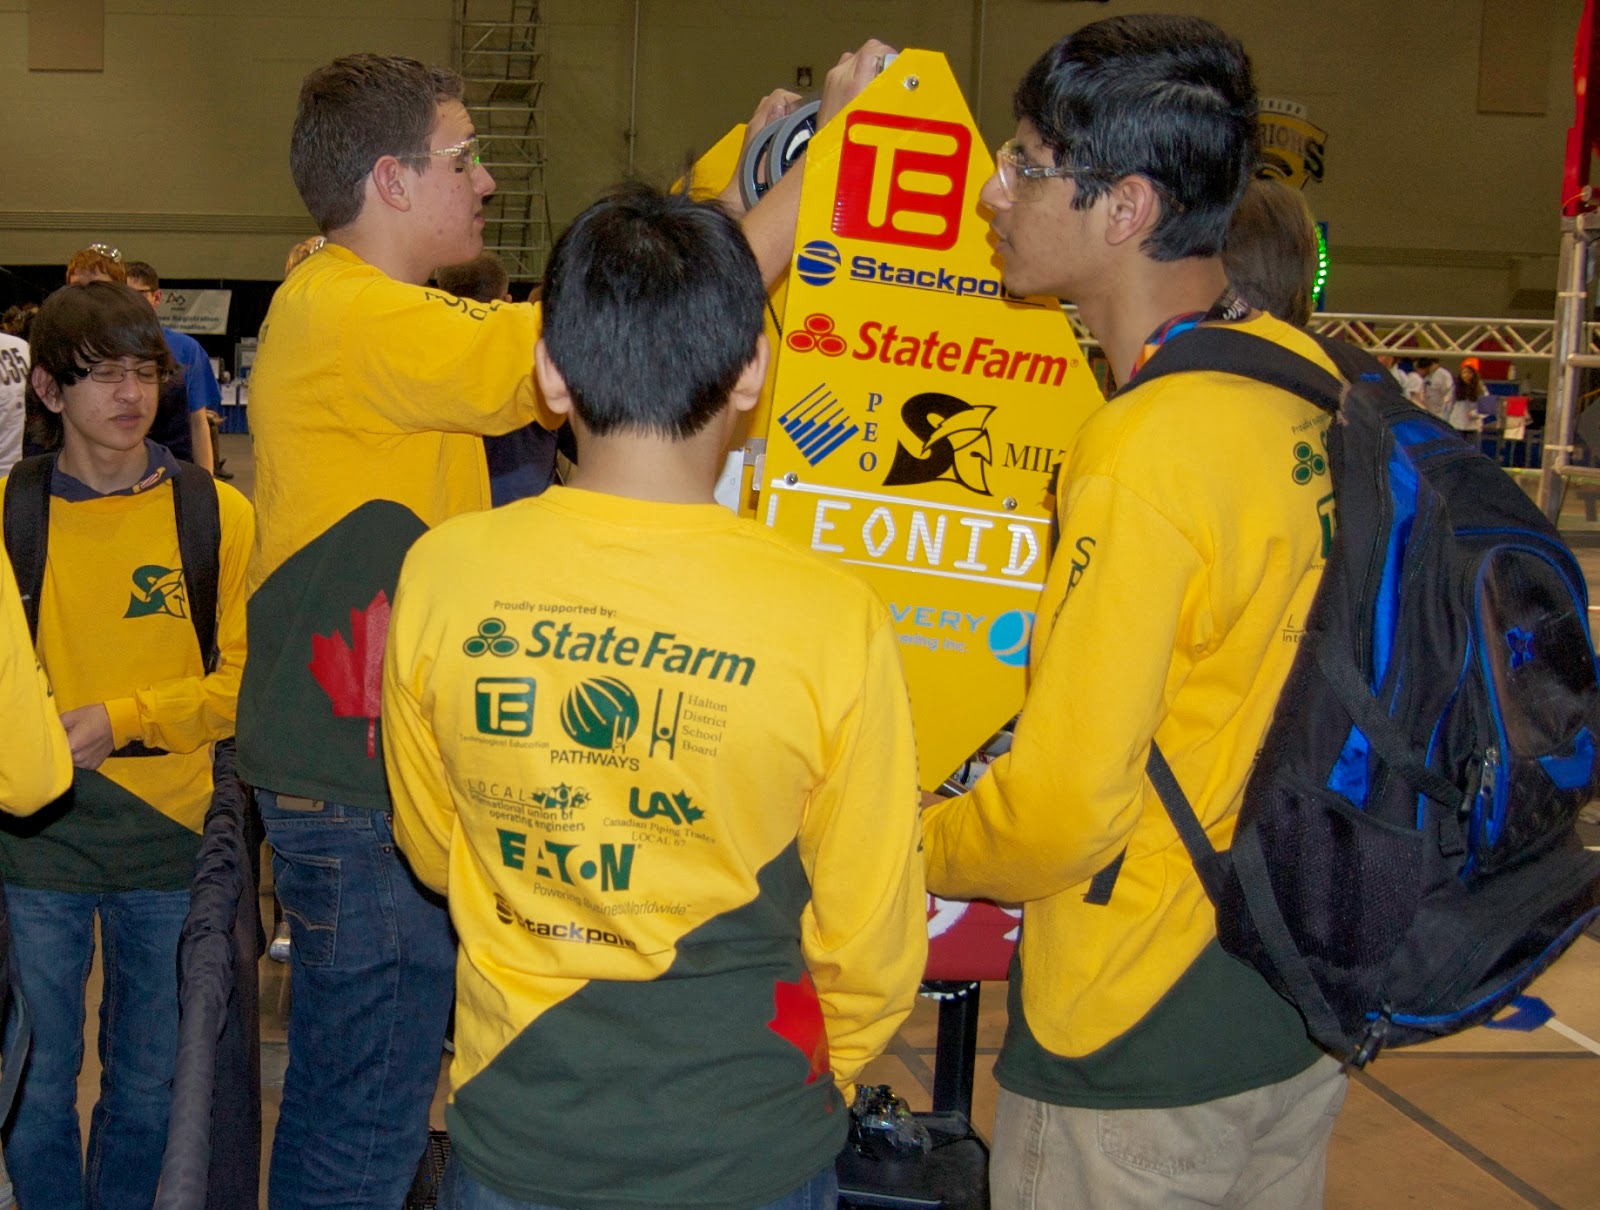


The students should feel proud of what they have achieved and they will certainly have gained many of the skills and much of the knowledge they need to continue with First Robotics next year. We had some help from 2 Stackpole International engineers, Andrew and Kelly and from a Discovery Precision Engineering machinist (team member parent) but keeping the club going will require some more mentors to help with the team organization and teaching. It was a lot of fun doing it all myself but very tiring and the team was often limited by just one adult in the room. We will be able to get a better start next year by revisiting this years challenge and doing some design work around Aerial Assist for practice.

Sunday, February 23, 2014

First Build Season

Now that the "Build Season" is over I can reflect on the last 7 weeks with a view to being better prepared for next year. In the First Robotics Challenge or FRC the scope of the challenge is released to the public at the start of January and the teams have just 7 weeks to build a robot that can meet the challenge. Thus the "build season". Now we have a couple of weeks to breathe and prepare for the actual competitions after the March break.
The finished robot meets all of the primary goals we set out:

  • pick up the ball
  • score a low goal
  • score a low goal in autonomous mode
  • catch the ball
  • use flip-up velcro bumpers to change from red to blue easily
The last few days of building consisted of figuring out how to make things work and stay within the competition constraints. One engineer that helped us out stated that an engineer's job is to understand "function" and "constraints" - what it does and what rules and materials you must work with. This helped me to better understand the preparation necessary going into a challenge like this. As the robot came together I had to ask "What could I have taught them to better prepare the students to face up to a challenge like this. Here is a list of some of the lessons that came to mind.

  1. At least some of the students have to be good at 3D modelling on a computer. We wrestled every day with vague ideas and pencil or whiteboard drawings that lacked any sort of precision, testing or detail. The 2 or 3 models we did end up with proved immeasurably important in the final design.
  2. The devil is in the details. The students required a better knowledge of the materials and mechanisms available to make the design work. Early designs for the pickup arm featured the wheels at the top rotating in blank holes with no source of power. Shaft and bearing sizes needed to be interpreted and sometimes guessed at. There are just a handful of companies that supply parts for First robots and many of these parts have associated step files online so integrating these parts into a 3D model is very easy to do.
  3. Once the ideas start to come together on the drawing table the students must be able to model their ideas both on screen and with mock-up models to insure that all of the robot parts interact and act in the way expected.
  4. Get the bumpers on early. The bumpers on the robot interact with the ball as it is picked up and so the bumpers, or a reasonable facsimile, need to be in place. You don't want to be waiting on finished bumpers when it is time to try out some aspects of the robot function.
  5. The students all need practice using hand tools to layout, cut and drill. For many this was their first or second experience with a hacksaw or electric hand drill. Precise measurement, accurate layout and skill with a hacksaw, drill press or portable drill were practiced for just a second or third time on the build.
  6. Knowledge of fasteners and threads:
    - nut and bolt sizes and types
    - tap and die use
    - use of wrenches, nut drivers and torque
  7. Knowledge and experience with pneumatic systems. We had no pneumatic systems experience or materials when we decided to use pneumatics to operate the arm. Students require a better understanding of the constraints and an ability to calculate required and applied forces.
  8. Knowledge of programming. We have some excellent programmers on our team and they handled the challenge of robot control with considerable skill. They were, however, hampered by not having a robot controller/computer to learn with until January 4. Advanced functions such as automatic targeting could not be attempted due to lack of time and experience.
  9. The electrical wiring went pretty well. Most of my students have some classroom experience at this. Review wire and fuse sizes and have some wire labels ready. The robot became a bowl of spaghetti at the last minute when 3 pneumatic solenoids (4 wires each) were added. A last minute glitch was caused when the arm pulled on a wire ever so slightly causing the robot to stall. Wiring needs to be neat and bundled and should not move when other moving parts operate.
I'm sure there are more but I think this is a list of the major lessons and learning that can happen next fall as the students head into their second year at this.

Wednesday, February 5, 2014

Second First Robotics post

I could have titled this post "White knuckles on a white road - on my way to borrow some robot parts."

A boat load of snow fell on Ontario today making the roads very slippery and white. I had arranged to visit some other teachers about 20 km away to borrow some parts for our First robot. I had no choice. I had to go today. The team, the students - are counting on me to get them these parts. All season radials on an old minivan. I just had to go and so with my knuckles getting white from gripping the wheel I set out in the middle of the day and slipped and slid my way down the highway.

The First Robotics organization asks participants to adhere to the tenant of "Gracious Professionalism".

"Gracious Professionalism is part of the ethos of FIRST. It's a way of doing things that encourages high-quality work, emphasizes the value of others, and respects individuals and the community.
With Gracious Professionalism, fierce competition and mutual gain are not separate notions. Gracious professionals learn and compete like crazy, but treat one another with respect and kindness in the process. They avoid treating anyone like losers. No chest thumping tough talk, but no sticky-sweet platitudes either. Knowledge, competition, and empathy are comfortably blended.
In the long run, Gracious Professionalism is part of pursuing a meaningful life. One can add to society and enjoy the satisfaction of knowing one has acted with integrity and sensitivity. - www.usfirst.org.
I received a dose of this ethos today when the teacher I visited loaded me up with more and more parts saying "Here, take another, take two in case one does not work. That looks a little battered, take another." - until my arms were loaded. Thanks David. You are the best.
And how is the robot going? Well with just over a week to go we are in gentle panic mode. A couple of planning missteps and a couple of mistakes mean we need to do a lot of work in the next few days. The team is excited and with some help and insights from some sponsor and mentor engineers we have some good ideas about what to do. I'm going to put a copy of the cover of the Hitchhikers Guide to the Galaxy on the cover of our game manual binder.

Wednesday, January 22, 2014

First for First

Its been a while since I wrote a post and I can't believe I'm finding a few minutes right now to do this but, well here goes.

I decided I had to write this after I came across this photo of an RC robot base we built at school several years ago. We had very little money to spend on this project so we bought two cordless drills, on sale at Canadian Tire. We cut the handles off of them and mounted them as seen above to power the bot. We extracted the motors and removed the chucks. We machined custom hubs to attach the motors to the 2 dolly cart wheels. The other 2 wheels are old swivel castors from a derelict cart. The dual DC motor controller was switched to multiplexed mode with 2 channels from the RC receiver. We could make this monster fly around the school with just one stick on the RC remote. It could turn on a dime and by giving it a little reverse from high speed you could stop on a dime. The two black decks were 1/4 inch PVC. The emergency stop button was useful more than once! With 2 sets of NiCd batteries and external chargers we could drive it all day.

I liked the picture above all the more because it stands in such stark contrast to our current First Robotics base which my team just completed last week.

The 2014 Kit Bot pictured here is the standard kit distributed to every team competing in the First Robotics league this year. 200 watt DC motors, gearboxes, belts and pulleys drive all six wheels with both speed and the ability to turn on the spot. Control is established from a driver station laptop via a local network to the onboard bridge and computer. The robot can operate autonimously or via driver input from the laptop using a joystick or game controller. The entrance fee to our first regional competition includes the Kit Bot. It took the students just a few days, following the included instructions, to assemble the base unit and get it running. They will have just 6 weeks to design, build, test and practice with a mechanism to complete this years challenge

Just a few years ago, working on the Skills Canada challenge, we worked on our robot once or twice a week building the base from scratch and building a mechanism on top. We started in September and worked until just after March break. This year, starting on January 4 we have until Feb 17.  So today we are about half way done. Six years ago 1/2 way done meant a working base and some ideas and plans for the rest. This year we have a working base, plans and a start on the rest so we're doing OK.

More to come.

Friday, August 30, 2013

Building High School Computer Labs

Many teachers spent this week organizing classrooms and curriculum or coaching some early Fall sports in preparation for the first day of school next week. I had the unenviable task of converting 2 classrooms into computer labs - with a little help from admin, staff and students. I've lost count of the number of times I've built or upgraded labs during the summer, 7 or 8 I think. It has become routine. The task went very well this week so I thought I'd write about it, about what works and what doesn't, in case you find yourself tackling a similar project.

The 2 new labs at Craig Kielburger are classrooms so the projector and window blinds were already in place.

Last Spring after the decision was made to go ahead and use the classrooms the tenders went out to get more electrical circuits and network drops installed.  This usually takes 2 or 3 months to complete. We asked for drops and outlets around the room perimeter and on a jiffy pole in the centre of the room. We got outlets and network drops around the perimeter but only electrical in the jiffy pole. So now most of the drops and outlets are not in a good location for any layout that I could see. That leads to rule #1.

RULE #1: Make a scale drawing of the room and put scale tables, computers and chairs into it. Figure out precisely where you want the outlets and drops and then go into the room and mark those spots with a marker. Leave copies of the layout taped to the walls and in the hands of admin. This could be a summative project for some Tech. Design students.

Most of the labs I've built in the past had no windows. I was glad to see the blinds in good working order in this classroom and I hope they are enough since those windows face south! In the past the ventilation was a problem in a basement lab and 2 labs at the core of the building. If classrooms are normally a bit too warm then turning them into a computer lab is a bad idea.

We ordered 50 refurbished computers last spring and they were delivered during the summer and then set up by technicians to be ready to go. We still encountered some minor problems with a few of the computers after they were installed in the new labs so rule #2.

RULE #2: Ask for an IT technician to be on call on setup day.

The computer tables were ordered last spring but did not arrive until setup day - phew! Close one.

RULE #3: Insure that all the materials you might need are in the building before setup day.

The classrooms still had books and unwanted shelves in them. Fortunately some staff were around in July and agreed to clean out what they could. Our caretaker took care of the rest.

RULE #4: Work with the caretaker. No one likes surprises or being left out of plans that affect them.

The admin were supportive and it goes without saying that losing 2 classrooms is going to make timetabling tough. Purchasing all the hardware and wiring takes planning and work by admin and staff so make sure everyone is kept up to date on the projects progress.

RULE #5: Work with admin.

Setup day actually spanned 2 days. During day 1 students hauled tables into the room, assembled them and then hauled computers into the room. Day 2 saw several student volunteer their day to position everything and plug everything in. Hopefully the word will get out that students built the lab - giving students the inclination to look after it.

RULE #6: Work with students. I've done one or two labs on my own. Its boring. This way students earn volunteer hours, I don't get a sore back and everyone has fun playing network games that are normally banned during school!

There we go. Some of my thoughts. I know I've missed something. Oh yea! Printers!

Wednesday, April 24, 2013

Raspberry Pi Computers in the classroom

On April 23 I hosted a student conference at Craig Kielburger Secondary School for students enrolled in the ICT SHSM program at my school and TA Blakelock HS in Oakville. In the morning the students enjoyed a Career Mash panel where 4 local business volunteers talked to the students about careers in the IT sector. Later the students heard about some of the excellent programs at Conestoga College including some degree programs like Integrated Telecommunications and Computer Technology Bachelors program. In the afternoon the students had 10 Raspberry Pi computers and had a First Look at this fascinating little computer.

Here is a quick 30 second video showing the students setting them up.


My August 6, 2012 post talks about my own Raspberry Pi set up. It still works well. The new kits comprise a Raspberry Pi, an Adafruit 1151 HDMI to VGA adapter, a 4 GB SDRAM card with the same version of Wheezy I used last August, mouse and keyboard, VGA monitor and 1A USB power supply. I had to modify the config.txt file and then clone 10 SD RAM cards for the students so that they would be able to boot up and get a graphics output to the VGA screen the first time. One of my students helped me out with this the week before the event and sure enough much head scratching ensued.

I started with my older version of Wheezy because I knew it worked with an HDMI to VGA adapter. I used a nearby Mac and an SD card adapter to quickly make changes to config.txt to try and find the correct settings for the Adafruit adapter. For the most part it looked to the other students as if we were staring at a black screen all afternoon! We were never able to get the latest version of Wheezy to display anything. That is why I stuck with my old version from last August. Adafruit's own forum was helpful in finally getting us going. These 2 commands will tell you which video modes the adapter supports:
/opt/vc/bin/tvservice -m CEA    // to get the CEA modes
/opt/vc/bin/tvservice -m DMT    // to get the DMT modes
It turns out that our brand new adapters only support CEA mode 1 (640 x 480 VGA), or just about the lowest resolution you can imagine. I'm waiting to see what Adafruit says about this.

Despite being limited to 640 by 480 the students quickly figured out how to make Scratch and Idle work to make Hello World programs. They got into the console and were able to use the command line for directory listing, running nano, ifconfig and ping and use the internet to find answers to their questions. There was much positive response and interest in learning more about this device. I'm going to repeat this exercise in a couple of days with some high school teachers.